Howdy Everyone! From our State Fair of Texas family to yours, we hope y’all had a wonderful holiday!
With the New Year right around the corner, our Errol McCoy Greenhouse on the Midway Manager, Drew Demler, has put together a few tips on growing black-eyed peas as well as two of his favorite recipes. Enjoy!
Not only are black-eyed peas bringers of good luck on New Year’s Day, they are also one of the most reliable veggies you can grow in Texas. Black-eyed peas are rock stars in the Southern summer garden. Originally from Africa, they are quite well equipped to handle the Texas heat. They require very little water once established and have few pest problems. Black-eyed peas are very prolific and often keep producing for several months.
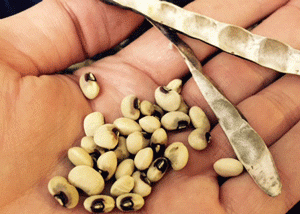
One of the best features of black eyes is that their bean-like pods can completely dry out on the plant before harvesting, which gives the gardener a long window for picking. The pods can hang on the plants for a very long time and never spoil. To rehydrate, the dried peas are soaked for a few hours or overnight in water before they are cooked. Black eyes can also be picked before they dry out, which is called the ‘green mature stage.’ When they are picked green mature, they have a flavor similar to lima beans.
 There are several varieties of black-eyed peas, and their relatives, to choose from when planning your garden. Some resemble bushes while some are vining. The vine types might require a trellis or support to climb. Crowder peas, purple hulls, and zipper crème peas are all very similar to black eyes and are all very durable, productive and delicious! This past year in the Big Tex Urban Farm, I grew California black eye #5 (my favorite), purple hull peas, and silver crowder peas. All three of these varieties that I grew performed well.
Don’t get in a hurry to plant black-eyed peas – mid April to early May is the ideal time to start them, but you can even plant them in the dead heat of summer and still have success. I started some in July of last year in the Urban Farm and the plants produced a huge fall harvest. B.E.Ps will normally start producing peas about sixty days after planting. When you are ready to get started, simply plant the seeds about an inch deep directly into warm soil.
So why do we eat black-eyed peas for good luck on New Year’s Day anyway? There are a few theories as to why this has become a tradition. Some say it started when William Sherman’s troops raided Confederate soldiers campsites for food. It is believed that the Union soldiers took everything but the black-eyed peas, which they thought were nothing but animal feed. The Southern soldiers considered it good luck that they were left with the black eyes as this allowed them to survive the following winter! Others think that the tradition was carried over from Jewish Europeans who had settled in the south. Black-eyed peas are traditionally served on Rosh Hashanah, the Jewish New Year, also for the purpose of bringing luck. Some think that black eyes are just a really great meal for cold, winter nights!

Once you harvest your black-eyed peas, it is time to head to the kitchen. When it comes to getting these babies cooked in delicious fashion, I refer to my cousin, Jed Demler. He is a professional chef and the owner of Savoureux, a local catering company. He has a couple of wonderful black-eyed pea recipes for us to try out this New Year’s Eve.
[divider style=”dotted” top=”20″ bottom=”20″]
Recipe #1: Traditional Black-Eyed Peas
Ingredients
- 1 pound dry black-eyed peas
- 1 TBS salt

- ½ TBS cracked black pepper
- 1 teaspoon dry mustard
- 4 cloves garlic peeled and rough chopped
- Half a small onion quartered
- 2 Tabasco peppers sliced in half (this could easily be Jalapenos, serrano or other hot chili)
- 4 or so slabs of bacon sliced in chunks
- 1 can chicken broth or stock
- 1 can water
Directions
- Soak black-eyed peas in water at least 4 hours. Can be over night.
- Rinse soaked black eyes in a colander.
- Brown bacon in the bottom of your pot over medium high heat until crisp
- Remove bacon and place on a plate lined with paper towels. Save for later use.
- Cook onion chunks in the remaining bacon grease over medium heat until you start to get some color on the onions about five minutes.
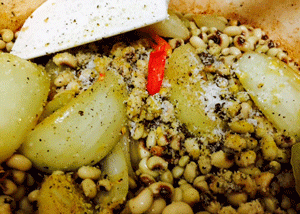
- Add black eyes, garlic, salt, pepper, dry mustard, peppers, chicken stock and water. Make sure peas are fully covered in liquid. Add more water if needed.
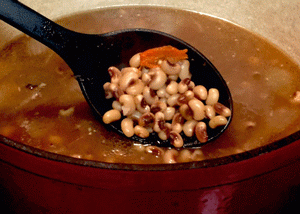
- Bring pot to a boil stirring often then reduce heat to a low simmer and simmer until black eyes get tender about an hour.
- Once the BEP’s are tender use the back of a large spoon and smash the peas onto the bottom or the side of the pot. Do this a few times. This is where the dish goes from good to great! Smashing the peas like this totally changes the texture of the dish making it very creamy.
- Stir in the bacon and enjoy.
[divider style=”dotted” top=”20″ bottom=”20″]
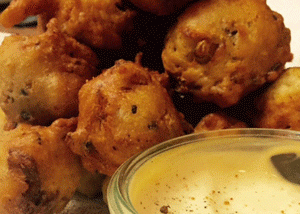
Recipe #2: Black-Eyed Pea Fritters (This recipe is perfect if you have any leftovers from the first recipe)
Ingredients
 ½ cup whole milk
- 1 cup all-purpose flour
- 1 large egg
- 1 ½ teaspoons baking powder
- 2 cups cooked black-eyed peas
- 1 tsp salt
- ½ tsp black pepper
- 1 tsp garlic powder
- ¼ tsp cayenne
- 2 TBS minced fresh herbs (chives, dill or parsley)
- Peanut oil for cooking
Directions
- Heat 2 inches of vegetable oil in a large skillet to 350 degrees.
- Lightly beat the egg and add to the milk. Stir together the flour, spices, and baking powder. Add the dry ingredients to the wet ingredients and stir until smooth. Fold in vegetables and herbs.
- Drop spoonfuls of mixture into hot grease, making sure not to overcrowd the pan (overcrowding brings the temperature of the oil down drastically and will affect the texture of your fritters). When edges turn golden brown, flip (flipping only once). The entire cooking process should take 90 seconds to 2 minutes!
- Remove from oil and immediately toss with salt.
That’s all I have for now. Hopefully you have enjoyed learning a little something about growing black-eyed peas, and I want to say a special thank you to my cousin Jed for sharing the amazing recipes. I’ll be back in the New Year with more. Until then happy gardening!
